How to Setup Claris Homepage v2.0
This tutorial will guide you step by step through configuring Claris Homepage v2.0
to upload files between your computer and your Server101 web site. For this exercise ,
you'll need to be online and you should have Claris Homepage v2.0 ready to go.
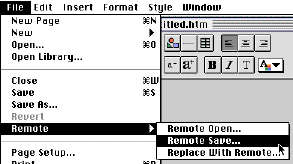
Open the page you want to upload to the server. Choose
"Remote Save..." from the
"File" menu as shown.

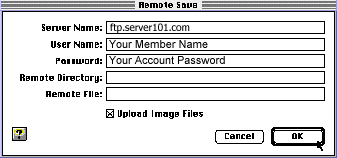
This window opens next, asking for the information required for uploading the page to the server:

Enter the following information:
- Server Name: ftp.server101.com
- User Name: Your Server101 MemberName
- Password: Your Server101 account password
Important note: Your User ID and Password are case sensitive. If you registered as "Jack", entering "jack" will not
work. The same applies to your password.
The next three items in the window are specific to the file you are uploading.
- Remote Directory. If you are placing your files in your home directory (IE.; so that they will open using your base URL but with no extra directory name, such as http://your_member_name.server101.com/filename.html)
leave this entry blank.
If you are uploading into a subdirectory you have created,enter the name of the that directory here. (Example: images/)
- Remote File. The name of your file. HomePage puts it there for you automatically.
- Upload Image Files. Check this box if you want linked images to go up to the site at the same time.
Click OK. If there are linked image files sitting in folders other than the folder your file is in, you will get a Warning
window to let you know that the image files will be copied into the current folder, and
that the links will be updated appropriately before everything is uploaded. Click Yes,
and your files will begin uploading. To abort the transfer, hit Ctrl + period (PC) or Command + period (Mac).
The next time you go to upload, the information will still be in the boxes, except for your password. If you want that to be there too, go to the Preferences window and check the appropriate box.
Downloading With HomePage
To download a file for editing, you should use an FTP program such as Fetch
(Mac) or WSFTP (Win). This is because there is no way to actually delete files
from the server using the built-in FTP features of Homepage 2.0. (of course, you can overwrite existing files by using the exact same filename)
To use HomePage's download ability, select Remote Open..., which will download a copy
of the file, or Replace with Remote..., which will replace an open file on your computer
with its counterpart from the server. Note that both these options do not remove
the file from the server. To do that you need to use a better FTP client.
Viewing Your Web Page
To view the page you just uploaded, use the following URL in your web browser:
http://membername.server101.com/filename (available about an hour after joining)
or http://www.server101.com/~membername/
- Substitute MemberName with your Server101 MemberName
- Substitute filename with the name that you gave your file.
(If you named your file index.html, then you only need to enter the URL as follows:
http://membername.server101.com/
or http://www.server101.com/~membername/ )
Tips & Suggestions
1. HTML Filenames are
case sensitive.
- We recommend you upload your files in lowercase only.
- When you write your html files, be sure and refer to any image or other html files in lowercase also.
Your HTML and actual filenames must match exactly, in order for your
page to display correctly.
2. MemberNames and Passwords are
case sensitive
- Remember that your User ID and Password are case sensitive and you must enter them
exactly as shown on your Welcome email.
For eg. if your membername is "joe", entering JOE will not work.
This also applies to your password, and the names of any files you upload. All are case sensitive.
Return to the FAQ and Tutorials Main Menu

