How to Setup Fetch FTPThis tutorial will guide you step by step through configuring Fetch FTP for the Mac to exchange files between your computer and your Server101 web site.For this exercise, you'll need to be online and you should have Fetch FTP for the Mac ready to go. 1/ Open Fetch After double clicking on the Fetch icon, select "Customize" then Preferences. In the dialog box click on the "Firewall" tab and tick the "Use passive mode transfers" checkbox. Click "Ok". 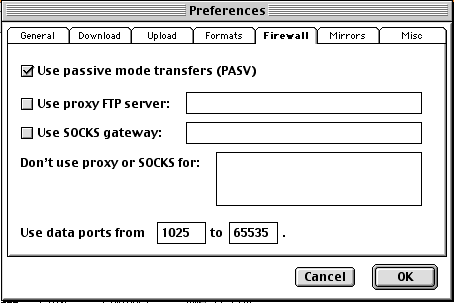
Then select "New Connection" from the "File" pull-down menu. A window will appear which will look similar to this:
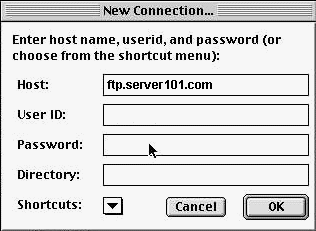
(a) You'll need to enter the following settings in the "New Connection" window:
Do NOT enter any other information beyond this point. There is no need to enter a directory name; the above settings will automatically place you in your base directory. Click OK to connect.2/ Publish your File Once you connect you will see the main directory window which should look like this:
Set "Automatic" for HTML and graphics files. To download, simply double-click on the desired file. To upload files using Fetch, click on the "Put File..." button. You will be prompted to select the file you wish to send. You will then be asked to provide a name to give the file on the server and also to pick a file format from a pop-up menu. To use the defaults, just click "OK", or select "ASCII" for HTML files and "Binary" for graphics files. You may also select "automatic." 3/ Viewing your web pageTo view the page you just uploaded, use the following URL in your web browser: http://membername.server101.com/filename (available about an hour after joining) or http://www.server101.com/~membername/
1/ Directly below the local and remote windows, you'll notice three buttons labeled ASCII, Binary, and Auto. For best results:
|
